TABLE OF CONTENTS
Subject 9 : Adobe Pagemaker (7 Class)
Subject 10 : CorelDraw ( 5 Class)
Subject 11 : Regional Languages (3 Class)
Subject 12 : Photoshop (9 Class)
Subject 13: Adobe Illustrator (5 Class)
Subject 14: Internet (7 Class)
Prepared by- Gulzar Jalil
Dated:-13/11/2026
Class No- 37
Adobe PageMaker 7.0( cl-1)
Introduction to DTP
DTP (Desktop Publishing) is the process of creating, designing, editing and printing documents using a computer. It is used to prepare attractive pages by combining text, pictures, colours and designs.
Examples of DTP:
- Visiting Cards
- Newsletters and Newspapers
- Books and Magazines
- Certificates
- Posters and Banners
- Marriage Invitations
Hard Copy: A printed copy of information on paper is called a Hard Copy.
Soft Copy: An electronic copy of information stored on a computer or other digital device is called a Soft Copy.
Subject 9: Adobe PageMaker 7.0
9.1 Introduction to PageMaker
Adobe PageMaker is a Desktop Publishing (DTP) software developed by Adobe. It is used to design and publish professional documents.
It supports English and other regional languages. We can use PageMaker to create books, newspapers, magazines, certificates, visiting cards and other printed materials.
9.2 Main Parts of PageMaker Window
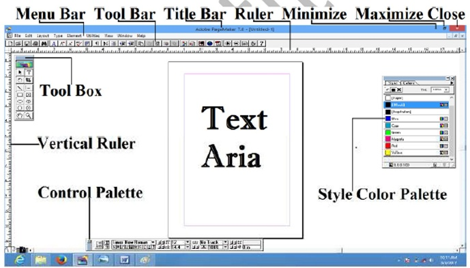
The PageMaker window contains the following important parts:
1. Title Bar: Displays the name of the software and the current file.

2. Menu Bar: Contains different menus such as File, Edit, Layout, Type, Element, Utilities, View and Window.

3. Document Window: The main working area where we create and edit documents.
Help us measure and position text and objects accurately.
5. Scroll Bars: Help us move the page up, down, left and right.
6. Page Icons: Used to move from one page to another in a multi-page document.
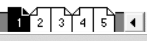
7. Master Page Icon: Used to create common designs such as page numbers, headers and footers that appear on multiple pages.

8. Toolbox: Contains different tools used to select, draw, move and edit objects.
9. Control Palette: Displays options for changing the size, position, font and other properties of selected objects.
10. Colors Palette: Used to apply different colours to text, shapes and other objects.
9.3 Creating a New Document
To create a new document in PageMaker, follow these steps:
- Click on the File menu.
- Select New.
Shortcut: Ctrl + N
The Document Setup dialog box will appear.
Important options of Document Setup:
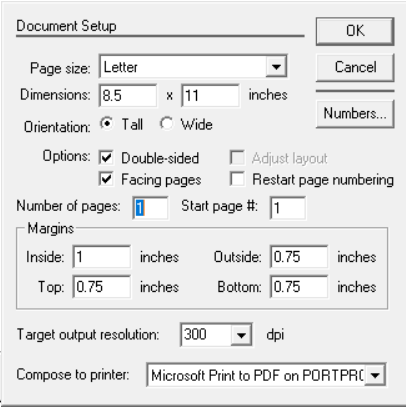
1. Page Size: Used to select the paper size, such as A4, A3, Letter, etc.
2. Dimensions: Displays the width and height of the selected page size.
3. Orientation: Determines the direction of the page.
- Portrait: Vertical page layout.
- Landscape: Horizontal page layout.
4. Options:
- Double-sided: When selected, the document is prepared for both left and right pages.
- Facing Pages: Displays two opposite pages together, like an open book.
5. Number of Pages: Used to specify the total number of pages in the document.
6. Start Page Number: Specifies the page number from which the document will start.
7. Margins: Used to set the blank space around the edges of a page.
Example: To create a 10-page book, select A4 size, Portrait orientation and enter 10 in Number of Pages.
9.4 Using the Toolbox
The Toolbox contains different tools used to create, select, draw and edit objects in PageMaker.
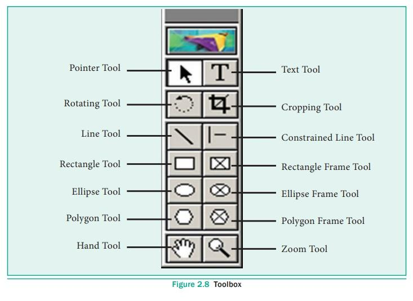
Important tools of the Toolbox are explained below:
1. Pointer Tool: Used to select, move, resize and arrange text or objects.
2. Text Tool: Used to create and edit text in a document.
3. Rotate Tool: Used to rotate selected objects or text.
4. Crop Tool: Used to remove unwanted outer parts of a picture.
5. Line Tool: Used to draw straight lines in any direction.
6. Constrained Line Tool: Used to draw straight horizontal, vertical or 45-degree lines.
Example: Draw a perfectly horizontal line.
7. Rectangle Tool: Used to draw rectangular and square shapes.
8. Ellipse Tool: Used to draw circles and oval shapes.
9. Polygon Tool: Used to draw polygons and star-shaped objects.
10. Rectangle Frame Tool: Used to create a rectangular frame for placing pictures.
11. Ellipse Frame Tool: Used to create a circular or oval frame for placing pictures.
12. Polygon Frame Tool: Used to create polygon-shaped frames for placing pictures.
13. Grabber Hand Tool: Used to move the page inside the document window without moving the objects.
14. Magnifier Tool: Used to zoom in and zoom out of a page.
9.5 Important Tool Settings
A. Polygon Settings
Double-click the Polygon Tool to open the Polygon Settings dialog box.
Important options:
1. Number of Sides: Sets the number of sides of a polygon.
2. Star Inset: Controls how deep the inner points of a star are.
B. Fill and Stroke Settings
Double-click the Rectangle Tool or Ellipse Tool to open the Fill and Stroke dialog box.
Important options:
1. Fill: Used to select the filling pattern or style inside a shape.
2. Fill Color: Used to select the inside colour of a shape.
3. Stroke: Used to select the outline style of a shape.
4. Stroke Color: Used to select the outline colour.
C. Rounded Corners Settings:
Double-click the Rectangle Tool to open the Rounded Corners dialog box.
It is used to make the corners of a rectangle rounded.
Class No 38
Adobe PageMaker 7.0(cl-2)
Colour Palette
2. Colour Application Buttons
| Button | Function |
| Line Color | Applies the selected colour to the object’s stroke or outline. |
| Fill Color | Applies the selected colour to the object’s Fill area. |
| Both color | Applies the selected colour to the object’s fill and inside area. |
3. Tint Option
Tint controls the intensity or lightness of the selected colour.
4. Understanding the Four Default Colours
A. [None]
- Represents the absence of colour.
- Removes the applied fill or stroke colour.
- Allows the background or underlying objects to show through.
- It is useful when we want an object to have no fill or outline.
B. [Paper]
- Represents the colour of the paper on which the publication will be printed.
- Usually appears white on the screen.
- It hides the objects behind it, allowing the paper colour to show through.
C. [Black]
- Represents 100% process black.
- It is used to apply black colour to text, lines and objects.
- It is commonly used for body text and headings.
D. [Registration]
- Used mainly in professional printing.
- It prints on all colour separation plates.
- It contains 100% of all process colours (Cyan, Magenta, Yellow and Black).
- It is mainly used for registration marks and printing alignment.
The palette also contains six commonly used colours.
5. Colour Information Icons
On the right side of each colour name, small icons are displayed. These icons provide information about the colour.
There are two types of information:
A. Colour Model Icon
It indicates the colour model used to define a colour, such as:
- RGB – Red, Green and Blue.
- CMYK – Cyan, Magenta, Yellow and Black.
- HLS – Hue, Lightness and Saturation.
B. Colour Type Icon
It indicates whether a colour is a:
- Process Colour – A colour created using a combination of printing inks.
- Spot Colour – A specially mixed ink used to print a particular colour separately.
6. New Colour Button
- New Colour
The New Colour button is used to create and add a new colour to the Colour Palette.
Steps to create a new colour:
- Open the Colour Palette.
- Click the New Colour button at the bottom.
- The Colour Options dialog box will appear.
- Enter a name for the new colour.
- Select the required colour type and colour model.
- Set the required colour values.
- Click OK.
The newly created colour will appear in the Colour Palette.
7. Delete Colour Button
The Delete Colour button (Trash icon) is used to remove an unwanted user-created colour from the Colour Palette.
Steps:
- Select the colour that you want to delete.
- Click the Delete Colour button.
- The selected colour will be removed from the palette.
Note: Default colours such as [None], [Paper], [Black] and [Registration] cannot be deleted.
8. Palette Menu
The small arrow at the top-right corner of the palette opens the Palette Menu.
It provides additional commands for managing the Colour Palette.
Style pallete
The Styles Palette in Adobe PageMaker is used to create, apply, edit, and manage text styles in a publication.
Default styles: PageMaker generally provides predefined styles such as Normal, Heading 1, Heading 2 and other styles, depending on the document and version.
2. Applying a Style
A style can be applied to selected text or a paragraph.
6. New Style Button
This button is used to create a new text style in the Styles Palette.
Steps to create a new style:
- Open the Styles Palette.
- Click the New Style button at the bottom.
- The Style Options dialog box will appear.
- Enter a suitable name in the Name box.
- Select the required formatting options.
- Click OK.
The newly created style will appear in the Styles Palette.
7. Delete Style Button
The Trash button is used to delete an unwanted style from the Styles Palette.
Control Palette
1. Control Palette for Text Formatting
- A. Apply ButtonApplies the value entered in the Control Palette to the selected object. We can also press Enter or Tab to apply changes.
B. Character View Button (T) :Displays the Character View of the Control Palette.
C. Font :Used to change the font family of selected text.
D. Type Size :Used to increase or decrease the size of selected text.
Examples: 10 pt, 12 pt, 14 pt, 18 pt and 24 pt.
E. Expert Tracking Option: Used to adjust the spacing between a range of selected characters.
F. Kerning : Used to adjust the space between two particular characters.
Difference between Tracking and Kerning:
- Tracking changes the spacing across a range of selected characters.
- Kerning changes the spacing between a particular pair of characters.
G. Paragraph View Button (¶) :Switches the Control Palette from Character View to Paragraph View.
H. Type Style : Used to change the appearance of selected text.
Common type styles include:
- Regular – Displays normal text.
- Bold – Makes text thicker and darker.
- Italic – Slants the text.
- Underline – Draws a line below the text.
- Reverse- Turn Selected text colour to white.
- Strike- Strikethrough text.
Other available styles depend on the selected font.
I. Case Options
- Normal Case – Displays text in its original case.
- Small Caps – Displays lowercase letters as smaller capital letters.
- All Caps – Converts all selected letters into capital letters.
J. Position Buttons
Used to change the vertical position of selected characters.
The main options are:
– Superscript – Places characters slightly above the normal text line. Example: X²
– Subscript – Places characters slightly below the normal text line. Example: H₂O
K. Leading Option
- Used to adjust the vertical distance between lines of text.
- It helps make paragraphs more compact or more spacious.
- Leading is generally measured in points.
Example: If the font size is 12 pt and leading is 14 pt, the distance between the baselines of successive lines is 14 pt.
L. Horizontal Scale Option
- Used to increase or decrease the width of selected characters.
- It changes the horizontal size of text without changing its vertical size.
- It is generally expressed as a percentage.
Examples:
- 100% – Normal width.
- 75% – Narrower characters.
- 125% – Wider characters.
M. Baseline Shift Option
- Used to move selected characters above or below the normal text baseline.
- It provides precise control over the vertical position of characters.
- It is useful for creating special text effects.
Example: We can raise a character slightly above the normal line without applying the standard Superscript format.
masomomsingi.com+2
3. Paragraph View – Paragraph Formatting Options
Paragraph View is used to format an entire paragraph or multiple selected paragraphs.
A. Apply Button: Applies the entered paragraph formatting values.
B. Character/Paragraph View Buttons
- Character button (T) switches to Character View.
- Paragraph button (¶) switches to Paragraph View.
C. Paragraph Style Option:-Allows us to apply a predefined paragraph style.
D. Alignment Options
Used to control the alignment of paragraph text.
There are five main alignment options:
1. Left Align: Aligns text along the left margin.
2. Centre Align: Places text in the centre between the margins.
3. Right Align: Aligns text along the right margin.
4. Justify: Aligns text evenly along both the left and right margins by adjusting word spacing.
5. Force Justify: Forces all lines, including the last line of a paragraph, to align with both margins.
E. Left Indent : Moves the entire paragraph inward from the left margin.
F. First Line Indent : Moves only the first line of a paragraph inward or outward.
G. Right Indent : Moves the paragraph inward from the right margin.
H. Space Above Paragraph :Adds extra space before the beginning of a paragraph.
I. Space Below Paragraph : Adds extra space after the end of a paragraph.
J. Grid Alignment : Controls how paragraph text aligns with the document’s baseline grid. It is useful for maintaining consistent line positions in multi-column publications.
K. Grid Spacing : Controls the spacing between lines according to the baseline grid. It helps maintain uniform line spacing throughout a publication.
4. Object View – Object Formatting Options
When we select a graphical object using the Pointer Tool, the Control Palette changes to Object View.
A. Reference Point
- Specifies the point of an object from which measurements and transformations are made.
- It is generally represented by a small reference-point grid.
- We can select different points, such as top-left, centre or bottom-right.
B. X Position
- Controls the horizontal position of an object on the page.
- It determines the distance of the selected reference point from the left side of the page.
C. Y Position
- Controls the vertical position of an object on the page.
- It determines the distance of the selected reference point from the top of the page.
D. Width (W) : Specifies the horizontal measurement of an object.
E. Height (H) : Specifies the vertical measurement of an object.
F. Constrain Proportions : Maintains the original proportion between the width and height of an object when resizing.
G. Rotation : Used to rotate an object clockwise or anticlockwise.
H. Horizontal Scale : Increases or decreases the horizontal size of an object.
I. Vertical Scale : Increases or decreases the vertical size of an object.
J. Horizontal Reflection :Flips the selected object horizontally. It produces a mirror image from left to right.
K. Vertical Reflection : Flips the selected object vertically. It produces a mirror image from top to bottom.
L. Skew :Slants an object at a specified angle.
5. How to Display or Hide the Control Palette
To display the Control Palette:
- Click the Window menu.
- Select Show/ Hide Control Palette.
- The Control Palette will appear on the screen.
Shortcut: Ctrl + ` (Control key + grave accent)
Class No 39
Adobe PageMaker 7.0(cl-3)
Text Blocks
1. What is a Text Block?
A Text Block is an area in PageMaker where we type or insert text. It is surrounded by a border called a frame.
2. How to Create a Text Block?
Follow these steps:
- Select the Text Tool (T) from the Toolbox.
- Click and drag on the page to draw a rectangular area.
- Release the mouse button. A Text Block will be created.
- A blinking cursor will appear inside the Text Block.
- Type the required text.
3. How to Select a Text Block?
- Select the Pointer Tool from the Toolbox.
- Click on the Text Block.
Use: To move, resize or modify the Text Block.
4. Windowshade in Text Block
A Text Block has two small handles on its upper and lower sides. These are called Windowshade Handles.
Windowshade is used to hide or show the text inside a Text Block without deleting it.
- Drag the Lower Windowshade Handle up to hide the text.
- Windowshade Handle turns to red and text below becomes hidden.
- Drag it down to show the hidden text.
5. How to Create a New Text Block from an Existing Text Block?
Follow these steps:
- Select the Pointer Tool.
- Click the Text Block containing extra text.
- Drag the Lower Windowshade Handle up to hide the text.
- Windowshade Handle turns to red and text below becomes hidden.
- Click on the Red Windowshade Handle.
- The cursor will change into a loaded text cursor.
- Click and drag on another area of the page to create a new Text Block.
The remaining text will automatically appear in the new Text Block.
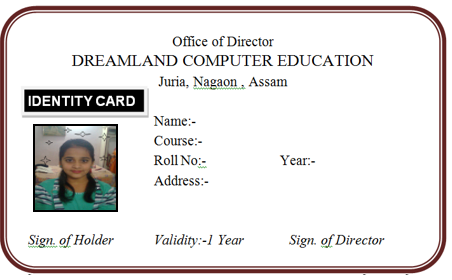
Make the I card below as demonstrated by your teacher-
Class No 40
Adobe PageMaker 7.0(cl-4)
File Menu
The File Menu contains commands used to create, open, save, import, export and print publications in PageMaker.
1. New (Ctrl + N) : Creates a new blank publication.
2. Open (Ctrl + O) : Opens an existing PageMaker publication.
3. Recent Publications (Alt + F + R) :Displays a list of recently opened publications (up to 10 files).
4. Save (Ctrl + S) :Saves the changes made to the current publication.
5. Save As (Ctrl + Shift + S) :Saves the current publication with a new name or in a different location.
6. Revert (Alt + F + V) : Restores the publication to its last saved condition. All changes made after the last save will be lost.
7. Place (Ctrl + D) : Used to insert text or graphic files from other applications into a PageMaker publication.
Steps:
- Select File → Place.
- Choose the required text or image file.
- Click Open.
- The loaded cursor will appear.
- Click or drag on the page to insert the file.
8. Acquire (Alt + F + U) : Used to scan photographs or documents directly into PageMaker through a connected scanner.
9. Export (Alt + F + E) : Used to export a PageMaker publication or its contents into other file formats.
Examples:
- PDF – For sharing and printing documents.
- HTML – For web pages.
- Graphic formats – For images.
10. Link Manager : Displays information about externally linked text and graphic files placed in a publication.
It helps us check, update or manage linked files.
11. Document Setup (Ctrl + Shift + P) :Used to change the basic publication settings, such as:
- Page Size
- Page Orientation
- Number of Pages
- Facing Pages
- Margins
12. Printer Style (Alt + F + Y): Used to save and manage printer settings for future printing.
9.18 Print :The Print Command is used to print a completed PageMaker publication on paper.
To print a publication:
- Select File → Print.
- The Print Document dialogue box will appear.
- Select the required printer and printing options.
- Click the Print button.
A. Print Document Dialogue Box
1. Printer : Used to select the printer connected to the computer.
2. Copies :Specifies the number of copies to be printed.
3. Collate
Arranges printed pages in the correct order when printing multiple copies.
Example: Suppose a document contains 3 pages and you want 2 copies.
- Collate Selected: 1, 2, 3 | 1, 2, 3
- Collate Not Selected: 1, 1 | 2, 2 | 3, 3
4. Reverse : Prints the pages in reverse order.
Example: If a document contains 3 pages, the printing order will be 3, 2, 1.
5. Proof : Prints a low-quality proof copy to check the document before final printing. It helps save ink and printing cost.
B. Pages : This option specifies which pages should be printed.
| Option | Meaning |
| All | Prints all pages of the publication. |
| Ranges | Prints only the selected page numbers. |
| Both Pages | Prints both odd and even pages. |
| Odd Pages | Prints only odd-numbered pages (1, 3, 5, 7…). |
| Even Pages | Prints only even-numbered pages (2, 4, 6, 8…). |
Example: To print only pages 2 to 5, select Ranges and enter 2–5.
6. Ignore Non-Printing Settings : Used to print objects that are marked as Non-Printing.
Example: If a text or graphic object is marked as Non-Printing, selecting this option allows it to be printed.
7. Reader’s Spreads : Prints two facing pages together on the same sheet of paper in their reading order.
Example: Used when printing a book or magazine in facing-page layout.
8. Print Blank Pages : Prints blank pages included in the publication.
Example: Useful when printing a book where blank pages are intentionally inserted.
C. Book Options : These options are useful when printing multiple publications as a book.
1. Print All Publications in the Book
Prints all publications included in the Book.
2. Use Paper Settings of Each Publication
Uses the individual paper settings of each publication while printing.
D. Orientation : Specifies the direction in which the page will be printed.
- Portrait: Prints the page vertically.
- Landscape: Prints the page horizontally.
E. Print Dialogue Box Buttons
1. Print : Starts printing the publication using the selected settings.
2. Cancel : Closes the Print dialogue box without printing.
3. Document : Opens the Print Document dialogue box, where we can select the required publication and its printing settings.
4. Setup : Opens the printer setup dialogue box to select or configure the printer and paper settings.
5. Options :Opens additional printing options.
F. Print Options
1. Scale : Used to increase or decrease the printed size of a publication by percentage.
Example: Enter 50% to print the publication at half its original size.
2. Reduce to Fit : Automatically reduces the publication to fit within the printable area of the selected paper.
Example: Prints an oversized design on an A4 sheet.
3. Thumbnails :Prints multiple reduced-size pages on a single sheet of paper.
Example: Prints 4 small page previews on one sheet for checking the overall layout.
4. Duplex :Used to print on both sides of a sheet of paper.
Note: The printer must support double-sided printing.
5. Printer’s Marks :Adds printing marks to help in professional printing and cutting.
Important types include:
- Crop Marks – Show where the paper should be cut.
- Registration Marks – Help align different colour plates.
- Colour Bars – Help check colour quality during printing.
Crop Only: Prints only crop marks.
6. Tile : Divides a large publication into smaller sections and prints them on separate sheets.
Example: Used to print a large poster that is bigger than the available paper size.
7. Color : Opens colour printing options to control colour output during printing.
Example: Used to select colour separation settings for professional printing.
8. Reset :Restores the Print Options settings to their default values.
Practical Exercise
After the instructor demonstrates the following tasks, create a publication in PageMaker and perform these activities:
- Create a new A4-size publication.
- Type a heading and a paragraph.
- Insert two photographs using the Place command.
- Save the publication as My_Publication.pmd.
- Change the page orientation to Landscape.
- Export the publication as a PDF.
- Open the Print dialogue box.
- Print all pages.
- Print only odd-numbered pages.
- Print two copies using the Collate option.
- Explore the Scale, Thumbnails and Duplex options.
Classroom Tip: Students should practise the File Menu commands first and then perform the printing activities using Print Preview .
Class No 41
Adobe PageMaker 7.0(cl-5)
Edit Menu
The Edit Menu contains commands used to edit, copy, cut, paste, duplicate and modify text or objects in a PageMaker publication.
1. Cut (Ctrl + X) : Removes the selected text or object and temporarily stores it on the Clipboard.
2. Copy (Ctrl + C) : Copies the selected text or object to the Clipboard without removing the original.
3. Paste (Ctrl + V) :Inserts the copied or cut text or object at the selected position.
4. Clear :Deletes the selected text or object without placing it on the Clipboard.
5. Select All (Ctrl + A) : Selects all text in the current Text Block when editing text, or all selectable objects on the current page when using the Pointer Tool.
6. Paste Multiple : Used to insert multiple copies of a selected object at once with specified spacing.
Steps:
- Select an object using the Pointer Tool.
- Press Ctrl + C to copy it.
- Select Edit → Paste Multiple.
- The Paste Multiple dialogue box will appear.
- Enter the required values.
Important options:
| Option | Meaning |
| Number of Copies | Specifies how many copies to create. |
| Horizontal Offset | Sets the horizontal distance between copies. |
| Vertical Offset | Sets the vertical distance between copies. |
7. Paste Special :Used to paste copied content from another application while selecting a suitable format or presentation method.
Example: Copy a table from MS Excel and paste it into PageMaker using an appropriate format.
Use: Helpful when working with objects copied from other software.
8. Insert Object :Used to insert or create an object from another application inside PageMaker.
Steps:
- Select Edit → Insert Object.
- Choose the required application or object type.
- Click OK.
- Create or edit the object in the selected application.
- Close the application or return to PageMaker.
Example: Create an Excel worksheet and insert it into a PageMaker publication.
9. Edit Story (Ctrl + E) :Opens the text of a publication in a separate window called the Story Editor.
Important features:
- Displays text from linked Text Blocks together.
- Shows text without pictures and most formatting.
- Makes long documents easier to edit.
- Changes made in Story Editor are reflected in the publication.
Shortcut: Select the Pointer Tool and triple-click inside a Text Block to open Story Editor.
10. Edit Original : Used to edit an object in the original application in which it was created.
This command is useful for objects inserted through Paste Special or Insert Object.
Example: If an Excel worksheet is inserted into PageMaker, Edit Original can open it in Excel for modification.
Shortcut: Select the object using the Pointer Tool and double-click it to open its original application (where supported).
Practical Exercise
After the instructor demonstrates the commands, perform the following activities:
- Create a new A4 publication.
- Type a heading and a paragraph.
- Practise Cut, Copy and Paste.
- Insert a photograph and create multiple copies using Paste Multiple.
- Change the horizontal and vertical spacing between copies.
- Copy a table from MS Excel and try Paste Special.
- Insert an object using Insert Object.
- Open Story Editor and edit the paragraph.
- Use Edit Original to modify an inserted object.
Home Practice: Practise all the Edit Menu commands and then create a BIO-DATA Form in PageMaker using text, lines, boxes and other necessary objects.
Class No 42
Adobe PageMaker 7.0(cl-6)
Layout Menu and Type Menu
A. Layout Menu
The Layout Menu contains commands used to manage pages, arrange page order, create columns, insert or remove pages and control the flow of text in a publication.
1. Go To Page : Used to move directly to a particular page in a publication.
Example: If a publication contains 50 pages and you want to open page 25, use Layout → Go To Page.
2. Insert Pages : Used to insert one or more new blank pages before or after the current page.
3. Remove Pages : Used to delete unwanted pages from a publication.
4. Sort Pages : Used to change the order or arrangement of pages in a publication.
Example: Move page 5 before page 3.
5. Go Back : Returns to the previously viewed page.
Example: If you move from page 2 to page 8, Go Back takes you to page 2.
6. Go Forward : Moves forward to the page from which you previously used Go Back.
Example: If you are on page 2 after using Go Back from page 8, Go Forward takes you back to page 8.
7. Column Guides :Used to divide a page into multiple columns for arranging text.
8. Copy Master Guides : Used to copy the column guides and ruler guides of a master page or layout to the current page, depending on the page setup.
Example: Apply the same guide arrangement to different pages of a magazine.
9. Autoflow : Used to automatically flow a large amount of text from one Text Block to the next page or multiple pages.
Steps to Use Autoflow:
- Copy or place a large amount of text into the publication.
- Select the Pointer Tool.
- Select Layout → Autoflow.
- Click the loaded text cursor on the first page or the existing Text Block’s out port.
- PageMaker automatically creates additional pages and Text Blocks as needed.
- The remaining text flows into those pages.
B: Type Menu
The Type Menu contains commands used to format text, change font style and size, adjust character spacing, set paragraph alignment and control paragraph formatting.
1. Font :Used to change the font type of selected text.
2. Size : Used to increase or decrease the size of selected text.
3. Leading : Used to change the vertical distance between lines of text.
4. Type Style : Used to apply different styles to selected text.
Important options:
| Option | Meaning |
| Normal | Displays normal text. |
| Bold | Makes text darker and thicker. |
| Italic | Makes text slanting. |
| Underline | Draws a line below text. |
| Strikethrough | Draws a line through text. |
| Reverse | Displays text in reversed colour style. |
5. Expert Kerning :Used to adjust the space between two particular characters (letters).
6. Expert Tracking : Used to increase or decrease the overall spacing between a group of selected characters.
7. Horizontal Scaling : Used to increase or decrease the horizontal width of selected text by percentage without changing its height proportionally.
8. Character (Ctrl + T) : Opens the Character dialogue box. It provides options to format individual characters or selected text.
9. Paragraph (Ctrl + M) : Opens the Paragraph Specifications dialogue box. It is used to format an entire paragraph.
10. Indents/Tabs (Ctrl + I) : Used to set paragraph indents and tab positions.
A. Indents : Indents are used to move text away from the margins.
- First Line Indent – Moves only the first line.
- Left Indent – Moves all lines from the left.
- Right Indent – Moves all lines away from the right.
B. Tabs : Tabs are used to position text at specific locations when the Tab key is pressed.
Example: In a table of contents, use dot leaders to connect chapter names with page numbers.
Example of Tab Leader
Chapter 1 …….. 05
Chapter 2 …….. 12
Chapter 3 …….. 20
11. Hyphenation : Used to divide long words at the end of a line with a hyphen (-) when there is not enough space to display the complete word.
12. Alignment : Used to change the alignment of text inside a Text Block.
There are four main types of paragraph alignment:
1. Left Align : Text starts from the left margin.
2. Centre Align : Text is positioned in the centre.
3. Right Align :Text ends at the right margin.
4. Justify :Text is aligned evenly along both margins.
13. Style :Used to apply predefined paragraph or character styles to selected text.
14. Define Styles (Ctrl + 3) : Used to create new styles or modify existing styles according to our requirements.
Practical Exercise
After the instructor demonstrates the Layout Menu and Type Menu, perform the following activities:
A. Layout Menu Practice
- Create a 5-page publication.
- Go to page 4 using Go To Page.
- Insert two new pages.
- Remove one unwanted page.
- Create a two-column layout using Column Guides.
- Practise Autoflow with a long paragraph.
B. Type Menu Practice
- Type a heading and a paragraph.
- Change the Font and Size.
- Apply Bold, Italic and Underline.
- Change the Leading of the paragraph.
- Practise Kerning and Tracking.
- Apply Left, Centre, Right and Justify alignment.
- Set First Line Indent and Left Indent.
- Insert Tab Leaders.
- Apply Hyphenation.
- Create a new style using Define Styles.
Class No 43
Adobe PageMaker 7.0(cl-7)
Element Menu
1. Fill : Used to change the inside colour or pattern of a selected shape.
2. Stroke :Used to change the border style, colour, and thickness of a selected shape.
3. Arrange : Used to change the position and order of objects on a page. It helps to place one object in front of or behind another object.
4. Align Objects : Used to arrange two or more selected objects in proper positions.
5. Text Wrap : Used to control how text flows around a picture or shape.
6. Group : Used to combine two or more objects into a single group so that they can be moved, resized, or formatted together.
7. Ungroup : Used to separate grouped objects into individual objects so that they can be edited separately.
8. Lock Position : Used to lock the position of a selected object so that it cannot be moved accidentally.
9. Unlock : Used to unlock a previously locked object so that it can be moved or edited again.
10. Mask : Used to hide unwanted parts of an object or picture and display only the required portion.
11. Unmask : Used to remove a mask and display the complete original object or picture again.
12. Image : This is unavailable.
2. Polygon Settings… : Used to change the settings of a polygon (a shape with multiple sides), such as the number of sides and star shape settings.
3. Rounded Corners… : Used to make the corners of a selected rectangular frame or shape rounded.
4. Link Info… : Used to view information about an imported or linked image or graphic file.
5. Link Options… : Used to control how linked images or text files are updated when their original external files are modified.
6. Non-Printing : Used to mark a selected object as a non-printing object. It remains visible on the screen but does not appear in the printed output.
7. Remove Transformation : Used to remove transformations such as rotation and skewing applied to a selected object and restore its original orientation.
Utilities Menu
1. Plug-ins : Opens a submenu of extra tools and automated tasks (such as Drop Cap, Bullets and Numbering, Change Case, and Sort Pages).
2. Find…( Ctrl + F) : Searches for specific words, characters, or formatting attributes within Story Editor.
3. Find Next(Ctrl + G) : Repeats the last search to jump to the next matching instance.
4. Change…( Ctrl + H): Finds specific text or formatting and replaces it with new text or formatting.
5. Spelling… (Ctrl + L) : Checks the spelling of selected text, the current story, or all stories in the publication (available in Story Editor).
6. Book… : Combines multiple separate PageMaker publication files into a single book list for unified page numbering, printing, and indexing.
7. Index Entry… (Ctrl + Y ): Marks selected text or topics to be included in an alphabetical index.
8. Show Index… : Displays a list of all current index entries so you can review, edit, or delete them before generating the final index.
9. Create Index…: Automatically compiles and formats all marked index entries into a complete index story.
10. Create TOC… : Generates a Table of Contents based on paragraphs formatted with specific styles (such as headings).
11. Define Colors… : Allows you to create, edit, delete, and manage custom spot or process colors in the publication’s color palette.
View Menu
1. Display Master Items : Used to show or hide objects placed on the Master Page.
2. Display Non-Printing Items : Used to show or hide objects marked as Non-Printing.
3. Zoom In(Ctrl+ +) : Used to enlarge the page view for a closer look at text, pictures and other objects.
4. Zoom Out (Ctrl+ -): Used to reduce the page view so that a larger area can be seen.
5. Actual Size(Ctrl + 1) : Displays the publication at its actual size (100% zoom).
6. Fit in Window (Ctrl + 0) : Adjusts the zoom level so that the entire page fits inside the document window.
7. Entire Pasteboard(Shift + Ctrl + 0) :Displays the entire pasteboard area surrounding the publication page.
8. Zoom To : Provides different preset zoom levels for viewing the publication.
9. Hide Rulers(Ctrl + R) : Used to hide the horizontal and vertical rulers displayed at the top and left sides of the document window.
10. Snap to Rulers(Alt + Ctrl + R) : Used to make objects automatically align with the nearest ruler measurement when they are moved or resized.
11. Zero Lock : Used to lock the zero point (0,0) of the horizontal and vertical rulers so that it cannot be changed accidentally.
12. Hide Guides (Ctrl + 😉 : Used to hide the guide lines displayed on the page. Selecting the option again displays the guides.
13. Snap to Guides (Shift + Ctrl + 😉 : Used to make objects automatically align with nearby guide lines when they are moved or resized.
14. Lock Guides (Alt + Ctrl + 😉 : Used to lock the guide lines so that they cannot be moved accidentally.
15. Clear Ruler Guides : Used to remove all horizontal and vertical ruler guides from the publication.
16. Send Guides to Back : Used to place guide lines behind text and graphic objects so that they do not interfere with selecting objects.
17. Hide Scroll Bars :Used to hide the horizontal and vertical scroll bars from the document window. Selecting the option again displays them.
Window Menu
1. Arrange Icons : Neatly aligns minimized publication icons along the bottom of the PageMaker workspace.
2. Tile : Resizes and arranges all open publication windows side-by-side so every window is visible simultaneously without overlapping.
3. Cascade : Stacks all open publication windows diagonally so their title bars remain visible for easy switching.
4. Hide/Show Tools : Toggles the display of the main Toolbox.
5. Hide/Show Control Palette(Ctrl + ‘ ) : Toggles the Control Palette.
6. Show/Hide Colors(Ctrl + J) : Opens or closes the Colors Palette used to apply fill and stroke colors to text and objects.
7. Hide/Show Styles (Ctrl + B ): Opens or closes the Styles Palette for applying and managing paragraph styles.
8. Show/Hide Layers(Ctrl + 8 ): Opens or closes the Layers Palette to organize, lock, or hide different overlapping elements on a page.
9. Show/Hide Master Pages(Shift + Ctrl + 8 ) : Opens or closes the Master Pages Palette for creating and applying recurring page layouts (headers, footers, margins).
10. Show/Hide Hyperlinks(Ctrl + 9 ) : Opens or closes the Hyperlinks Palette to create and manage clickable links and anchors for PDF or HTML export.
11. Plug-in Palettes: Opens a submenu to display additional floating palettes installed via plug-ins (such as Picture Palette or Scripts).
12. Open Document : Lists all currently open publications.
********END*******